Contact me
When purchasing a kit directly and you can't put a message in PayPal please let me know through mail which kit you purchased so I can send you the downloadlink!
Mail me
chichidezign@gmail.com
Hugz Cin
Snag My Blinkie


CT Blinkie

Snag my Stalkerbadge

Tuesday, January 18, 2011
Tutorial Timeless Romance (FTU)
* I used the licensed artwork from Anna Marine
You can purchase her work at CDO Here
* FTU kit - Timeless Romance of Gothic Inspirations
You can find her blog Here and the kit Here
* Font i used: Oceanside
* Plugins:
Eye Candy 4000 - Gradient Glow
1. Open a new canvas, 750 by 700 transparent.
2. Copy and paste Frame1-GI_TimRom as a new layer.
Resize with 50 % - all layers NOT selected.
Edit - sharpen once. Add drop shadow 0, 0, 85, 10.00 - black.
3. Using the selection tool- set on rectangle - draw out a rectangle shape in the center of the frame
New layer - Copy and paste a paper of choice in selection.
Selections - select none.
4. Copy and paste Frame5-GI_TimRom as a new layer.
Resize with 85% - all layers NOT selected.
Edit - sharpen once - Arrange to the bottom of your tag.
5. Copy and paste Doodle-GI_TimRom as a new layer.
Arrange the doodle below the flowers.
6. Copy and paste Wings-GI_TimRom as a new layer.
Arrange to the bottom of your tag.
7. Copy and paste Leaves-GI_TimRom as a new layer.
Resize with 65 % - all layers NOT selected.
Arrange this to the top and arrange as above.
then erase part of the branch so it looks like it is weaved.
See example

8. Copy and paste Flower2-GI_TimRom as a new layer.
Resize with 35 % - all layers NOT selected.
Duplicate the flower - resize with 65 %.
Arrange both as above.
9. Copy and paste WordArt1-GI_TimRom as a new layer.
Resize with 50 % - all layers NOT selected.
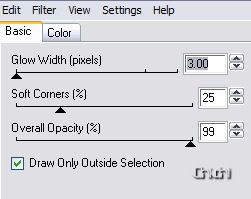
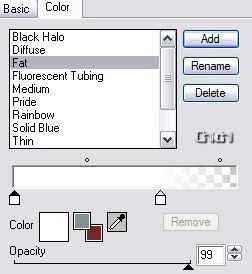
Effects - plugins - Eye Candy 4000 - Gradient Glow
Use following settings


Add drop shadow 0, 0, 85, 8.00 - black.
10. Copy and paste your tube of choice as a new layer.
Arrange as you like and add drop shadow to your likes.
11. Using a font of choice - add your name to your tag
Add proper copyright info then save as .png
Nog geen nederlandse vertaling voor deze les beschikbaar.
This tut was written on 08/31/2010.
The concept of the tutorial is copyrighted. Please feel free to LINK to the tutorial , please do NOT copy it any way to put online, pass out or re-write without permission.
The image you create using this tutorial is for you to do what you wish except for monetary gains or for merchandising.
© Cindy 2010 Any resemblance to another tutorial is purely coincidental. Proud member of TWI http://www.tutorial-writers-inc.com/
Labels:Tutorials
Subscribe to:
Post Comments
(Atom)
Chichi Designz
- Autumn Gold (1)
- Be My Pinkatine (1)
- Boo'lloween (1)
- Broken I (1)
- Broken II (1)
- CT Tags (3)
- Catch A Wave (1)
- Chichi Designz Store (42)
- Christmas Star (1)
- Collab Templates (5)
- Collab kits (3)
- Cool For The Summer (2)
- Creeped (1)
- Crew Only (1)
- Dark Love (1)
- Dark Secrets (1)
- Dead Of Night (1)
- Delicate Pastel (1)
- Dreams (1)
- Fairy World (1)
- Fall Forrest (1)
- First Frost (1)
- Get Spooked (1)
- Gothic Inspirations (1)
- It's Spring (1)
- Keen4Halloween (1)
- Lady Gothic (1)
- Lin's Spring (1)
- Love Shivers (1)
- Masks (3)
- Moments (1)
- New Beginnings (1)
- Nocturne (2)
- Nostalgic Romance (1)
- Purple Desire (1)
- Romantic Music (1)
- Royalty (1)
- Solace Garden (1)
- Spring Tide (1)
- Springtime Serenade (1)
- Sultry Persuasion (1)
- Sweet Life (1)
- Tag Templates (14)
- Teal 'Ween (1)
- Tropic Fever (1)
- Tutorials (3)
- Whispers Of Nature (1)
- Winter Blessing (1)
- Winter Bliss (1)
- Winter Gold (1)
Search
Blogroll
-
-
-
-
-
-
-
-
GI ♰BOGO MADNESS♰8 years ago
-
-


0 comments:
Post a Comment